


Tutorial: Deploying a Config Instance with Miru
The first of multi-part series exploring how to use Miru, and diving deep into how the system works behind the scenes.

Intro
Your robot needs a new config.
Maybe you're adjusting inference thresholds. Maybe you're tuning telemetry intervals for a customer fleet.
Whatever the change, you want it to be versioned, deployed quickly, and safely.
In this tutorial, we’ll show you how to do just that with Miru.
We’ll walk through the full lifecycle:
Loading a config in local development
Deploying configs in production using the Miru agent
And how Miru ensures the right config gets to the right robot, every time
By the end, you’ll know how to:
Use the Miru agent to pull configs in production
Read parameters using the Miru C++ SDK
Understand how config deployment works under the hood
Scenario: Object Detection
We're running a robot with an object detection module. It's using a YOLO model on a camera feed.
We want to configure things like:
Which YOLO version to run
What FPS to use
Thresholds like confidence and NMS
Output settings like bounding boxes or filtered labels
To define these parameters, we will use a configuration schema. The schema defines the shape of the config: what fields exist, their types, valid ranges, and default values. Currently, Miru supports JSON Schema, which is widely used and has code generation for many languages. However, support for other configuration languages is coming soon. Here are some popular ones.
Throughout the lifecycle of our robot, our schema will change. We may add/delete parameters or update the constraints for our values. To track this evolution, we introduce a config type called object-detection . This config type groups every version of the schema and every instance we’ve ever deployed. It becomes the source of truth for how our object detection module should behave across our fleet.
Quick Definitions
Before we continue through our example, let’s define a few key terms:
Config Type
A named group of parameters, like
object-detection,mobility, ormotion-planner. It tracks every version of the schema and every instance that has ever been deployed. Defined automatically from the$miru_config_type_slugin your schema.Schema
Defines the structure of the config, including valid fields, their types, default values, and allowed ranges. This is the contract your config instance must follow.
Config Instance
The actual values used by your robot at runtime. Must conform to the schema.
Tags
Labels attached to a device, like
compute_device: Jetson Orinorregion: EMEA. Tags carry metadata used to generate config instances.Overrides
Overrides are a ruleset that overrides the default schema with the specific configuration values your robot needs. The tags supply the values used in the override.
In development, you write the schema and config instance by hand (usually as YAML files). No cloud or agent required.
In production, you push the schema to Miru. Miru renders a config instance for each device based on its tags and your overrides.
File Structure
Here’s the file tree for this example. You can follow along or check out the complete code here.
.
├── cpp/
│   ├── main.cpp                  # Entry point — just calls run_object_detection()
│   ├── object_detection.cpp      # Core logic — loads and reads config
│   └── object_detection.h        # Header file for the module
├── schemas/
│   └── object-detection.schema.yaml     # Defines the shape and defaults for the config
├── config-instances/
│   └── object-detection.config.yaml     # Local-only config instance (used in dev)
├── CMakeLists.txt                # Builds the project using the Miru C++ SDK
This is a minimal setup: one config type, one schema, one module.
How the Schema and Config Work Together
Here’s the object detection schema:
$miru_config_type_slug: "object-detection"
title: Object Detection
type: object
properties:
  model_name:
    type: string
    default: "yolov9"
  inference_fps:
    type: integer
    minimum: 1
    maximum: 60
    default: 15
  confidence_threshold:
    type: number
    minimum: 0.0
    maximum: 1.0
    default: 0.7
  nms_threshold:
    type: number
    minimum: 0.0
    maximum: 1.0
    default: 0.4
  image_resolution:
    type: object
    properties:
      width:
        type: integer
        default: 1280
      height:
        type: integer
        default: 720
  draw_bounding_boxes:
    type: boolean
    default: true
  label_filter:
    type: array
    items:
      type: string
Miru uses the schema to extract the config type slug (object-detection) and to generate a hash of the schema, which acts as the version ID.
Every time you change the schema, the hash changes. Miru uses it to track the schema versions over time and across the fleets.
Here’s the matching config instance for the schema:
model_name: yolov9
inference_fps: 15
confidence_threshold: 0.8
nms_threshold: 0.4
image_resolution:
  width: 1920
  height: 1080
draw_bounding_boxes: true
label_filter:
  - "person"
  - "car"
This is the actual set of values a device will use at runtime.
Miru guarantees that every config instance matches its schema, and if they don’t, the error is thrown at deploy time, not runtime, saving you from crashing your application.
Local Development
Now that we’ve set up our code environment, let’s start using Miru. In development, you load both the schema and the config instance from disk.
The main draw of using Miru in development is speed. When you’re experimenting/tuning a parameter, you don’t want to version a config, push it to the cloud, write an override, and wait for your agent to pull the update. You just want to tweak a value and see it reflected immediately.
Miru still enforces that the config instance matches the schema. You get a typed config object, and the SDK handles loading, validation, and parsing for you.
Note the use of from_file(). This tells the SDK to load both the schema and config instance from disk:
auto config_instance = miru::config::ConfigInstance::from_file(
    "schemas/object-detection.schema.yaml",
    "config-instances/object-detection.config.yaml"
);
You can then query parameters like this:
auto fps = miru::query::get_param(config_instance, "object-detection.inference_fps").as_int();You can use get_param() to access any parameter in your config by path. The path matches the structure defined in your schema.
If the parameter doesn't exist or has the wrong type, the SDK throws a descriptive error.
Here’s the (dummy) output of my object-detection module:
$ ./build/object_detection

Using config instance:
=======================

model_name: yolov9
inference_fps: 15
confidence_threshold: 0.7
nms_threshold: 0.4
image_resolution:
  width: 1280
  height: 720
draw_bounding_boxes: true

Starting object detection with the following parameters:
- Model: yolov9
- FPS: 15
- Confidence Threshold: 0.7
- NMS Threshold: 0.4
- Resolution: 1280x720
- Draw Bounding Boxes: yes
Production Deployment
Once you’re ready to ship, swap from_file() with from_agent().
auto config_instance = miru::config::ConfigInstance::from_agent(
    "schemas/object-detection.schema.yaml"
);
Now, instead of reading a config from disk, your app reaches out to the Miru agent running on the device. The agent fetches a config instance from the cloud—tailored to that device—based on its tags and the current schema.
Here’s how it works under the hood:
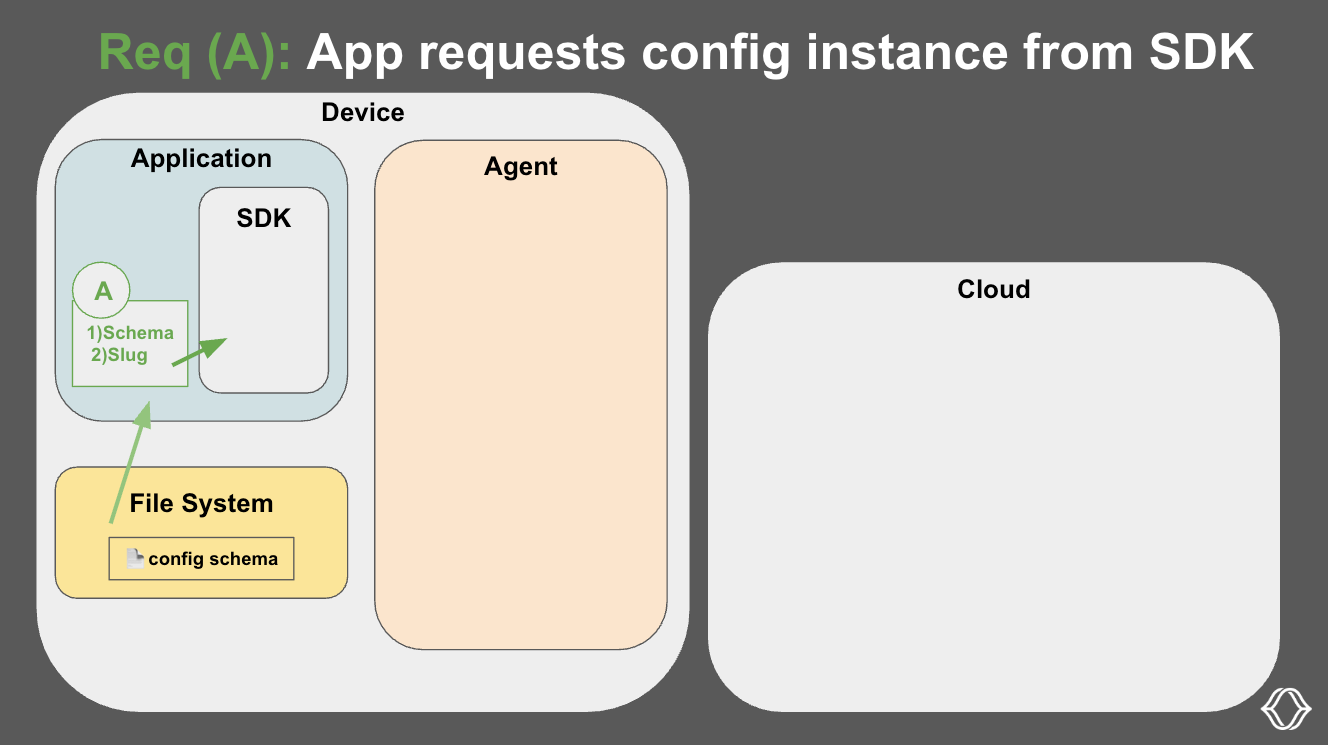
A: App requests a config from the SDK
Your application calls from_agent(), passing in the schema from the local file system.
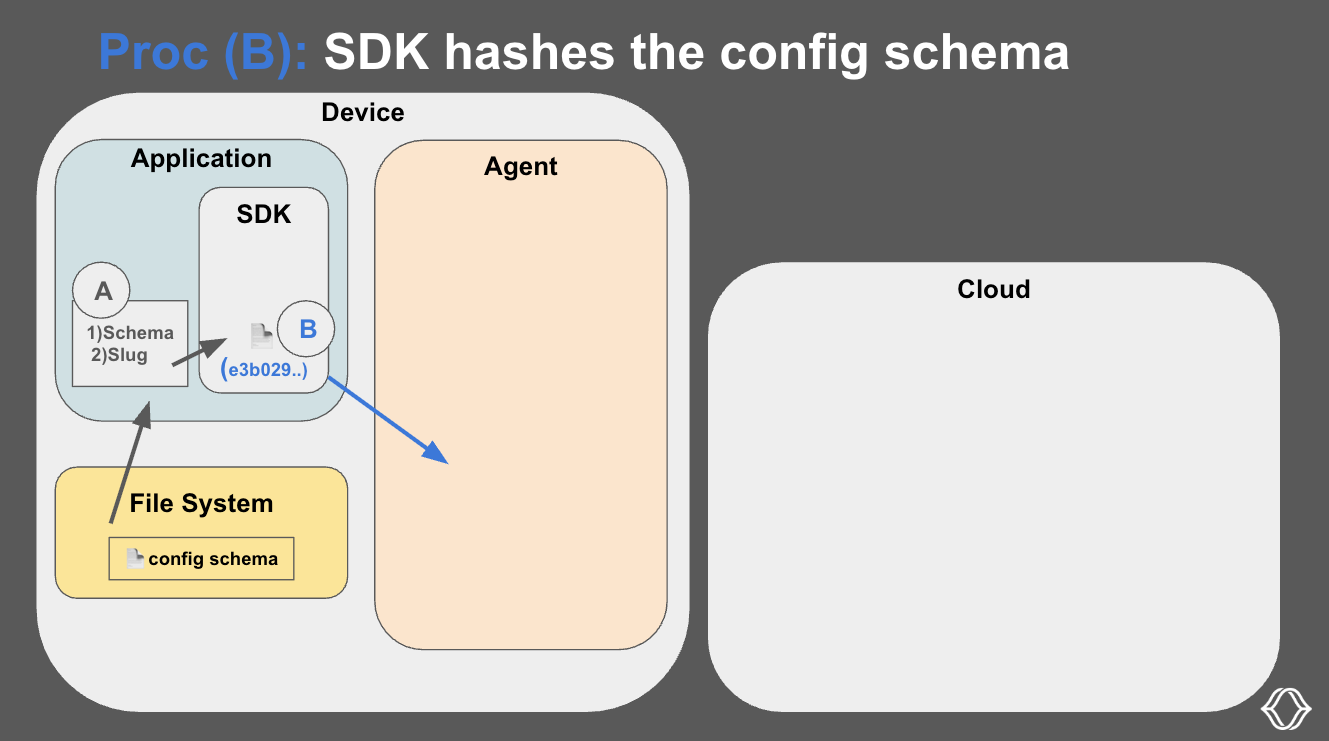
B: SDK hashes the config schema
The SDK reads your config schema file, hashes it (to get the digest), and extracts the slug. The hash and config slug uniquely identify the version of the schema that you are using.
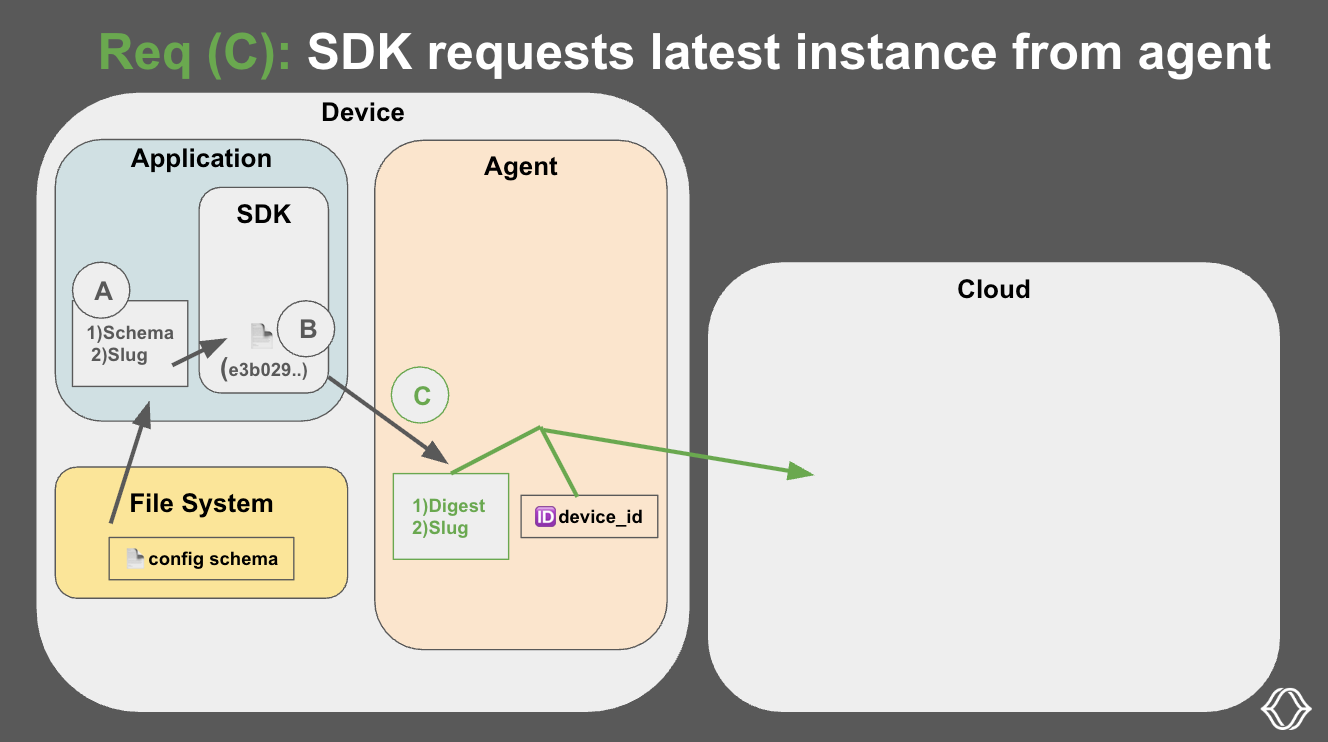
C: SDK requests the latest instance from the agent
Next, the SDK sends that hash and slug to the Miru agent over a UNIX socket. The agent also grabs the device ID.
We don’t cover auth in this tutorial, but it’s simple: run the install script, paste in the activation token from the Miru UI, and the agent ties itself to that device.
D: Agent requests the latest instance from the cloud
The agent sends a request to the cloud. At this point, the cloud knows:
What schema version you're using (via digest + slug)
Which device is asking (via device ID)
Because network disconnections are common in robotics, Miru also keeps a local cache of the last known config instance. In the case the network is unavailable, it will pull the config instance from the cache.

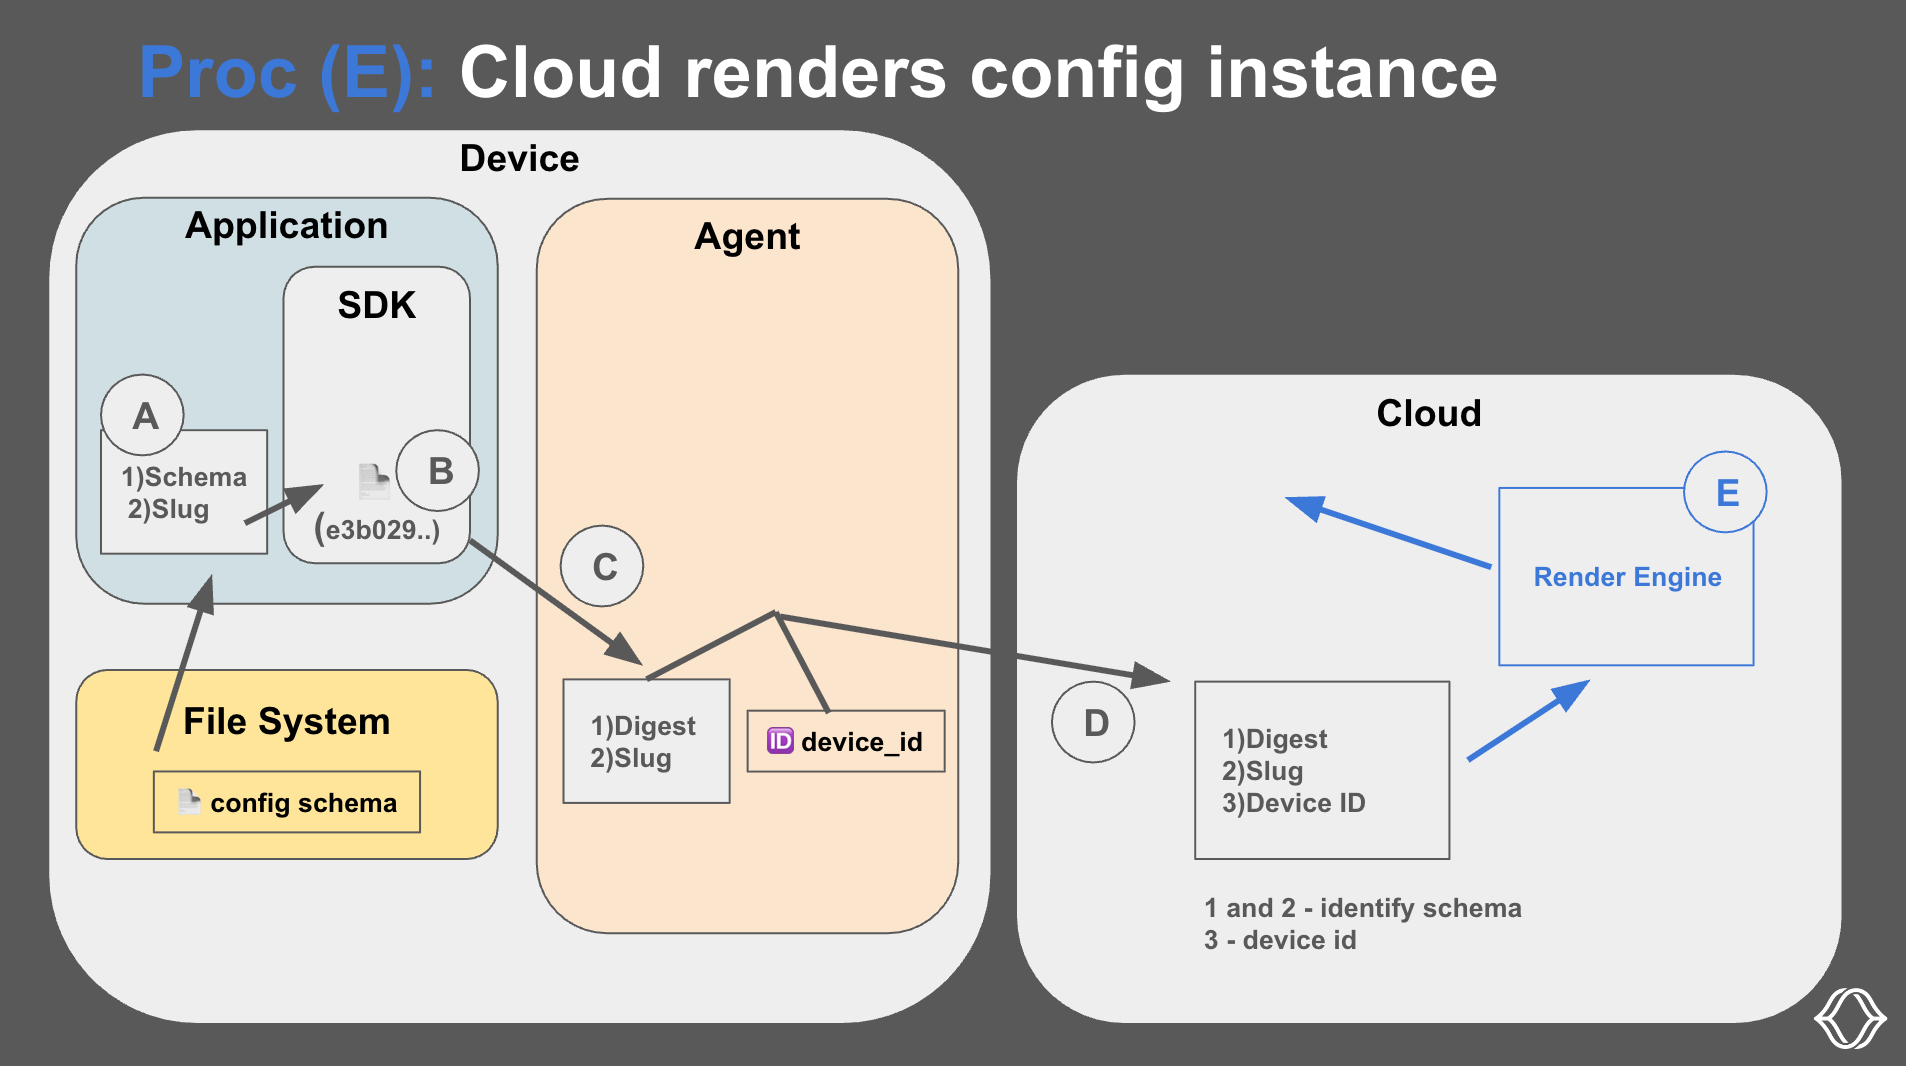
E: Cloud renders the config schema
In the cloud, the rendering engine renders the config instance. It takes the information provided by the agent, along with the tags, metadata, and overrides defined in the cloud, to generate the config instance.
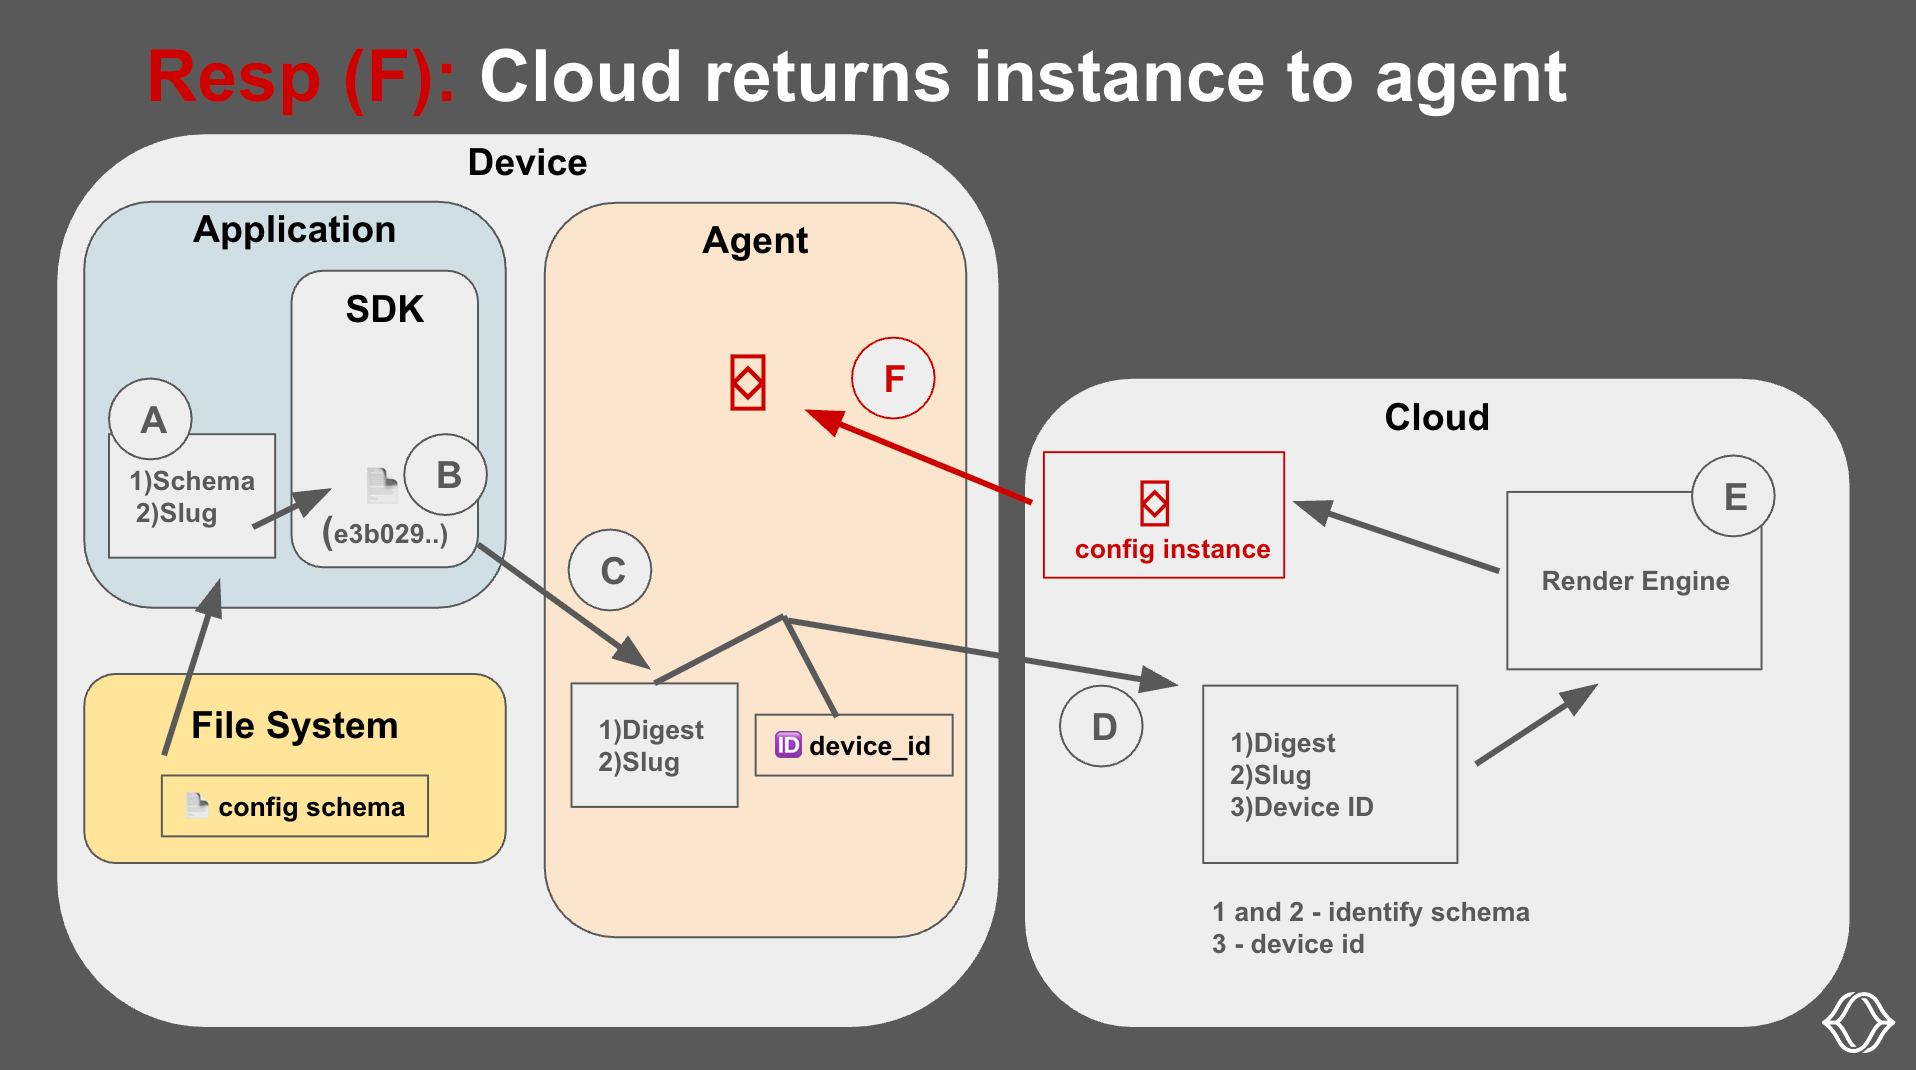
F: Cloud sends the instance back to the agent
Once rendered, the cloud sends the config instance back to the agent. The agent caches it on disk, so it can keep serving it even if the device goes offline.
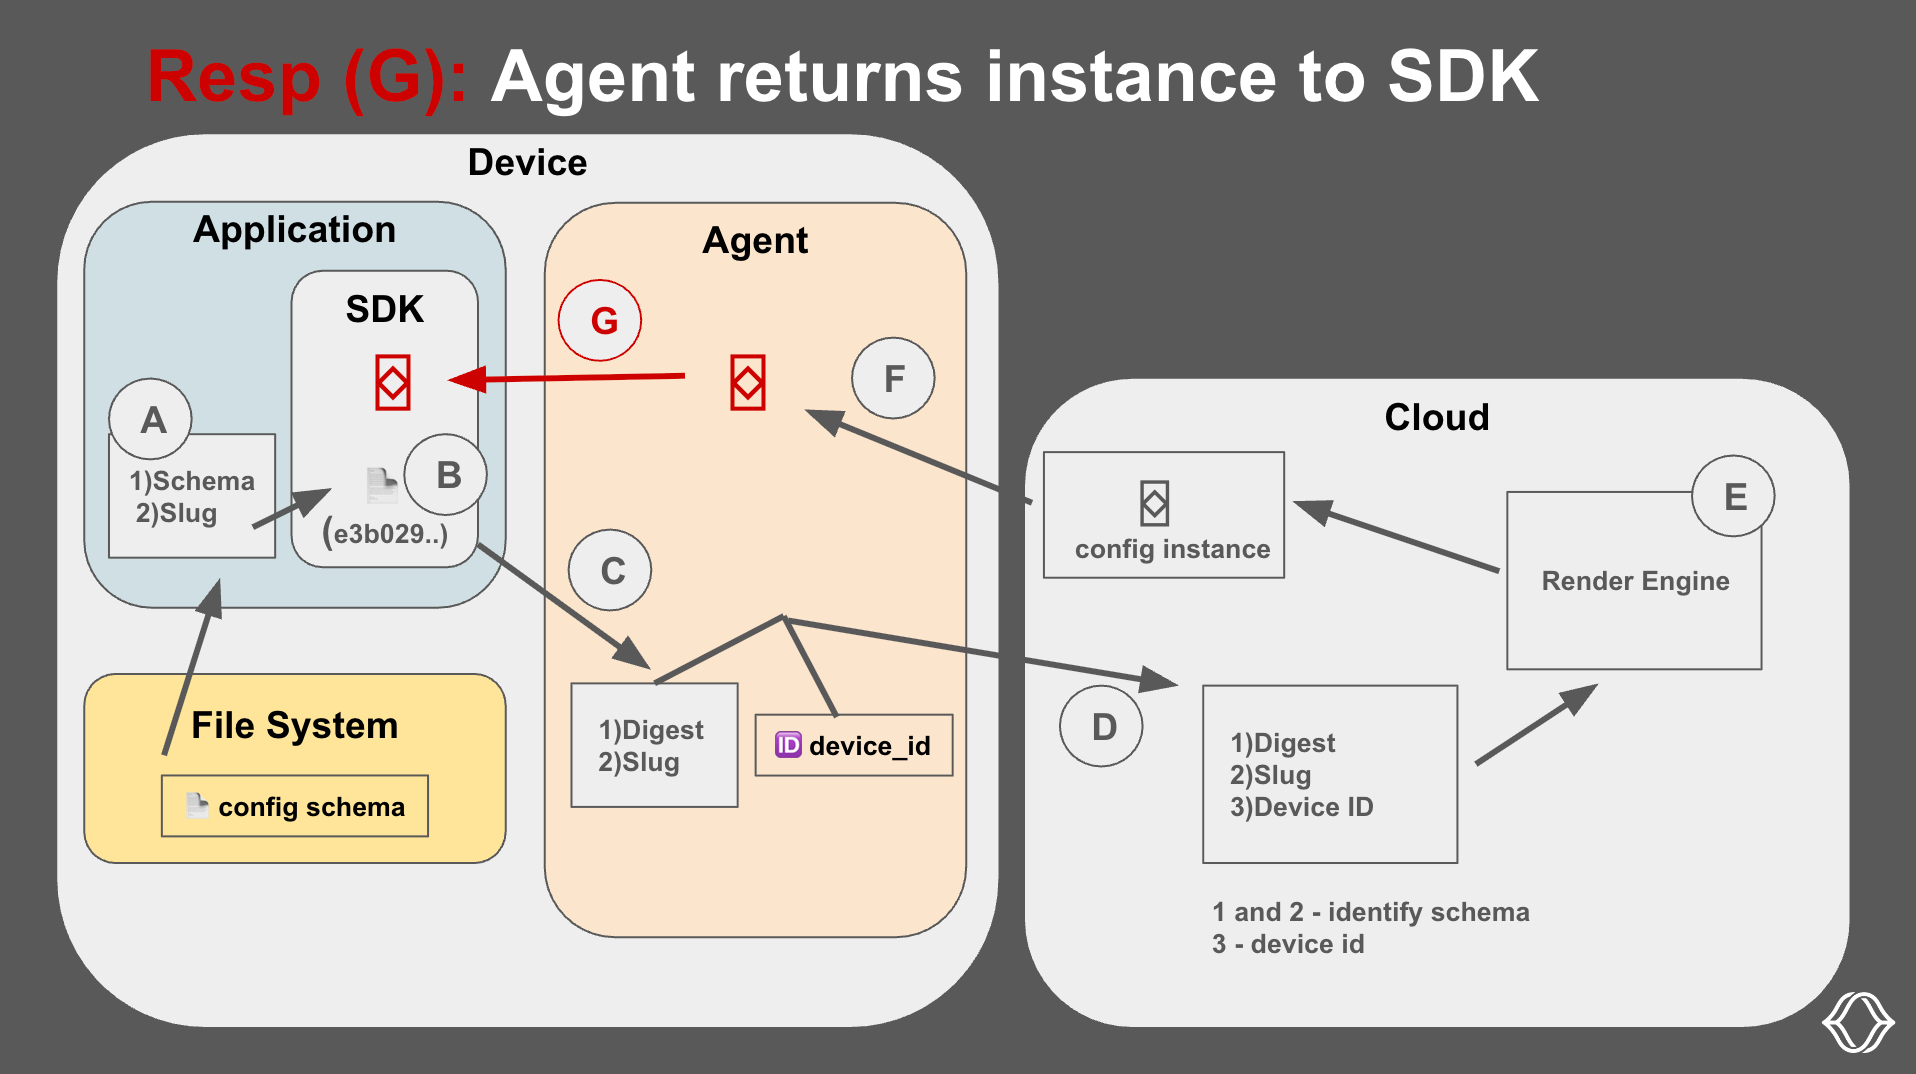
G: Agent returns the instance to the SDK
The agent returns the config instance to the SDK.
H: SDK returns the instance to the application
Your app receives a fully typed config object, ready to use.

Conclusion
You’ve now seen how to use Miru to load configs in development and how to deploy them in production using the Miru agent. You saw how the SDK hashes your schema, how the agent identifies the device, and how the cloud returns the correct config instance.
Miru handles versioning, delivery, and caching to simplify config deployment.
Head over to the docs to try it yourself, and don’t hesitate to reach out if you have any questions!